Unity3D基础教程3-3:材料与阴影
2014-08-11 21:11:36|?次阅读|上传:huigezrx【已有?条评论】发表评论
关键词:Unity3D, 游戏, 虚拟现实|来源:唯设编程网
Unity Manual > User Guide > Working with Assets > Materials and Shaders
Unity 手册-> 用户指南-> 与资产合作-> 材料与阴影
There is a close relationship between Materials and Shaders in Unity. Shaders contain code that defines what kind of properties and assets to use. Materials allow you to adjust properties and assign assets.
在Unity里,材料与阴影之间有一个紧密的关系。阴影包含定义什么类型的属性和资产去使用的代码。材料允许你去调整属性及分配资产。

A Shader is implemented through a Material 阴影通过材料实现
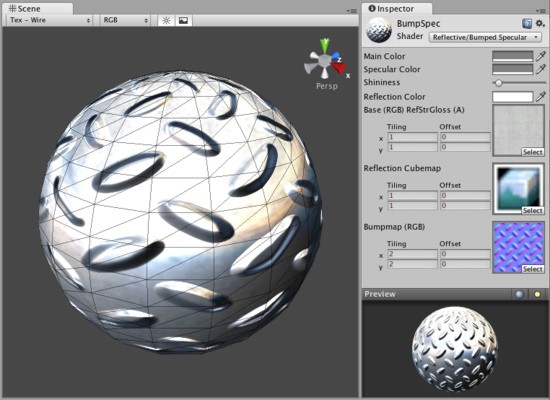
To create a new Material, use Assets->Create->Material from the main menu or the Project View context menu. Once the Material has been created, you can apply it to an object and tweak all of its properties in the Inspector. To apply it to an object, just drag it from the Project View to any object in the Scene or Hierarchy.
创建一个新材料,从主菜单条使用Assets->Create->Material 或Project View(项目视图)环境菜单。一旦材料已经被创建,你可以应用它到一个对象并在检视器面板里修改它的所有属性。应用到一个对象,从Project View(项目视图)里仅拖拽它到在场景或层次里的任何对象上即可。
Setting Material Properties 设置材料属性
You can select which Shader you want any particular Material to use. Simply expand the Shader drop-down in the Inspector, and choose your new Shader. The Shader you choose will dictate the available properties to change. The properties can be colors, sliders, textures, numbers, or vectors. If you have applied the Material to an active object in the Scene, you will see your property changes applied to the object in real-time.
你可以选取你希望任何特别的材料阴影去使用。在检视器里简单展开阴影下拉,选择你的新阴影。你选择的阴影将按指定可用的属性改变。属性可以是颜色、滑动块、纹理、数量或向量。如何在场景里你已经应用材料去激活属性,你将实时看到你的属性改变应用到对象。
There are two ways to apply a Texture to a property.
有两种方法去应用纹理到属性。
1. Drag it from the Project View on top of the Texture square 从项目视图里拖拽它到纹理方块上
2. Click the Select button, and choose the texture from the drop-down list that appears 点击Select按钮,从下拉框显示的列表里选择纹理。
Two placement options are available for each Texture: 两个布局选项对每个纹理是可用到的:
|
Tiling贴瓷 |
Scales the texture along the different. 沿不同缩放纹理 |
|
Offset 偏移 |
Slides the texture around. 环绕纹理滑动 |
Built-in Shaders 内置阴影
There is a library of built-in Shaders that come standard with every installation of Unity. There are over 30 of these built-in Shaders, and six basic families.
有一个内置阴影库,Unity的标准版本带有全部的预安装。有超过30的内置阴影以及6个基本系列:
◆ Normal: For opaque textured objects.
◆ 标准:适合于不透明纹理对象
◆ Transparent: For partly transparent objects. The texture's alpha channel defines the level of transparency.
◆ 透明:适合于部分透明对象。纹理的alpha通道定义透明性的等级。
◆ TransparentCutOut: For objects that have only fully opaque and fully transparent areas, like fences.
◆ 透明切除外观:适用于仅全部白底和全部透明区域的对象,像栅栏。
◆ Self-Illuminated: For objects that have light emitting parts.
◆ 自身照明:适用于有光放射部分的对象。
◆ Reflective: For opaque textured objects that reflect an environment Cubemap.
◆ 反射:适用于反射环境立方体映射的不透明纹理对象。
◆ Lightmapped: For objects that have an additional Lightmap texture and corresponding texture UV channel.
◆ 光波映射:适用于拥有附加的光波映射纹理机交叉纹理UV通道的对象。
In each group, built-in shaders range by complexity, from the simple VertexLit to the complex Parallax Bumped with Specular. For more information about performance of Shaders, please read the built-in Shader performance page
在每个分组里,内置阴影复杂的范围从简单顶点到镜面凸起视差集合。更多关于阴影的特性信息,请阅读内置阴影特性页。
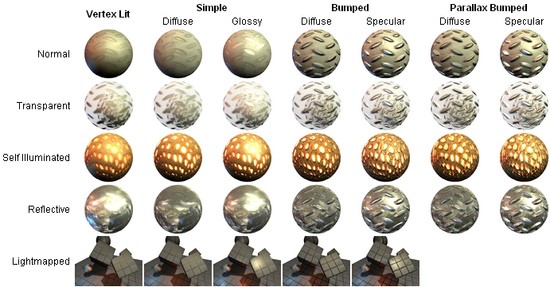
This grid displays a thumbnail of all built-in Shaders: 这个表格显示的所有的内置阴影缩微图:

The builtin Unity shaders matrix Unity内置的阴影矩阵
Shader technical details 阴影技术详细资料
Unity has an extensive Shader system, allowing you to tweak the look of all in-game graphics. It works like this:
Unity有一个广泛的阴影系统,允许你调整所有在游戏里的图形外观,它的工作像这样地:
A Shader basically defines a formula for how the in-game shading should look. Within any given Shader is a number of properties (typically textures). Shaders are implemented through Materials, which are attached directly to individual GameObjects. Within a Material, you will choose a Shader, then define the properties (usually textures and colors, but properties can vary) that are used by the Shader.
一个阴影主要定义一个公式在游戏里的阴影看起来如何。任何给定的阴影的内部是一个属性数据(特色的纹理)。阴影是以材料为工具直接附加在专用的GameObject上。一个材料内部,你将选择一个阴影,然后定义属性(通常是纹理与颜色,但属性可以变更)通过阴影来使用。
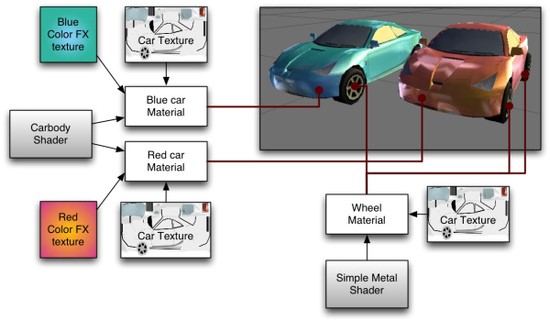
This is rather complex, so let's look at a workflow diagram: 这更适合集合,因此让我们观察一个工作流图表:

On the left side of the graph is the Carbody Shader. 2 different Materials are created from this: Blue car Material and Red car Material. Each of these Materials have 2 textures assigned; the Car Texture defines the main texture of the car, and a Color FX texture. These properties are used by the shader to make the car finish look like 2-tone paint. This can be seen on the front of the red car: it is yellow where it faces the camera and then fades towards purple as the angle increases. The car materials are attached to the 2 cars. The car wheels, lights and windows don't have the color change effect, and must hence use a different Material. At the bottom of the graph there is a Simple Metal Shader. The Wheel Material is using this Shader. Note that even though the same Car Texture is reused here, the end result is quite different from the car body, as the Shader used in the Material is different.


 CATIA/CAA
 SWING
SWING MFC
MFC Unity3D
 Android
 JQuery
 ASP.NET