Unity3D基础教程3-8:资产服务(Asset Server)指南
2014-08-13 19:19:25|?次阅读|上传:huigezrx【已有?条评论】发表评论
关键词:Unity3D, 游戏, 虚拟现实|来源:唯设编程网
Resolving conflicts
With multiple people working on the same collection of data, conflicts will inevitably arise. Remember, there is no need to panic! If a conflict exists, you will be presented with the Conflict Resolution dialog when updating your project .
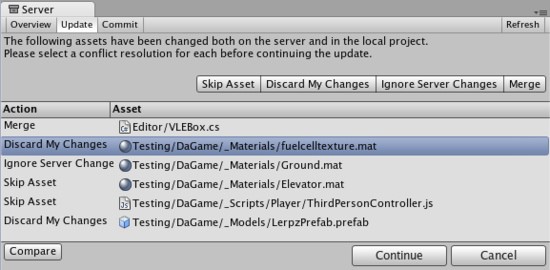
The Conflict Resolution screen
Here, you will be informed of each individual conflict, and be presented with different options to resolve each individual conflict. For any single conflict, you can select Skip Asset (which will not download that asset from the server), Discard My Changes (which will completely overwrite your local version of the asset) or Ignore Server Changes (which will ignore the changes others made to the asset and after this update you will be able to commit your local changes over server ones) for each individual conflict. Additionally, you can select Merge for text assets like scripts to merge the server version with the local version.
If you run into a conflict while you are committing your local changes, Unity will refuse to commit your changes and inform you that a conflict exists. To resolve the conflicts, select Update. Your local changes will not automatically be overwritten. At this point you will see the Conflict Resolution dialog, and can follow the instructions in the above paragraph.
Browsing revision history and reverting assets
The Asset Server retains all uploaded versions of an asset in its database, so you can revert your local version to an earlier version at any time. You can either select to restore the entire project or single files. To revert to an older version of an asset or a project, select the Overview tab then click Show History listed under Asset Server Actions. You will now see a list of all commits and be able to select and restore any file or all project to an older version.
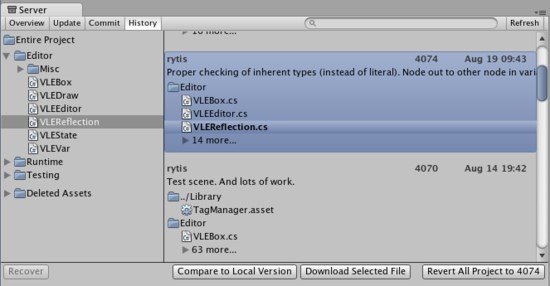
The History dialog
Here, you can see the version number and added comments with each version of the asset or project. This is one reason why descriptive comments are helpful. Select any asset to see its history or Entire Project for all changes made in project. Find revision you need. You can either select whole revision or particular asset in revision. Then click Download Selected File to get your local asset replaced with a copy of the selected revision. Revert All Project will revert entire project to selected revision.
Prior to reverting, if there are any differences between your local version and the selected server version, those changes will be lost when the local version is reverted.
If you only want to abandon the changes made to the local copy, you don't have to revert. You can discard those local modifications by selecting Discard Changes in the main asset server window. This will immediately download the current version of the project from the server to your local Project.
Comparing asset versions
If you're curious to see the differences between two particular versions you can explicitly compare them. To do this, open History window, select revision and asset you want to compare and press Compare to Local Version. If you need to compare two different revisions of an asset - right click on it, in the context menu select Compare to Another Revision then find revision you want to compare to and select it.
Note: this feature requires that you have one of supported file diff/merge tools installed. Supported tools are:
-
On Windows:
- TortoiseMerge: part of TortoiseSVN or a separate download from the project site.
- WinMerge.
- SourceGear Diff/Merge.
- Perforce Merge (p4merge): part of Perforce's visual client suite (P4V).
- TkDiff.
-
On Mac OS X:
- SourceGear Diff/Merge.
- FileMerge: part of Apple's XCode development tools.
- TkDiff.
- Perforce Merge (p4merge): part of Perforce's visual client suite (P4V).
Recovering deleted assets
Deleting a local asset and committing the delete to the server will in fact not delete an asset permanently. Just as any previous version of an asset can be restored through History window from the Overview tab.
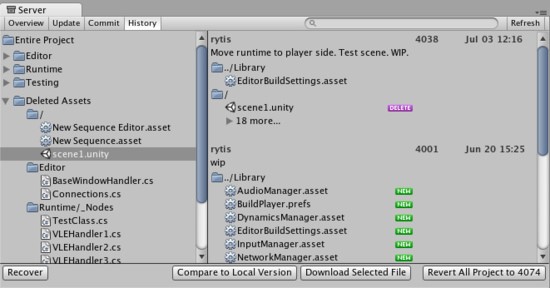
The History dialog
Expand Deleted Assets item, find and select assets from the list and hit Recover, the selected assets will be downloaded and re-added to the local project. If the folder that the asset was located in before the deletion still exists, the asset will be restored to the original location, otherwise it will be added to the root of the Assets folder in the local project.
Asset Server training complete
You should now be equipped with the knowledge you need to start using the Asset Server effectively. Get to it, and don't forget the good workflow fundamentals. Commit changes often, and don't be afraid of losing anything.

 CATIA/CAA
 SWING
SWING MFC
MFC Unity3D
 Android
 JQuery
 ASP.NET